

| 26 |
| 27 |
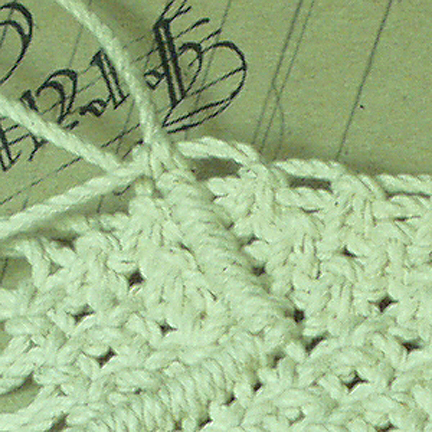
(Pics. #26 and #27) The inner portion of the diamond being filled in and as completed.
(Pic. #28) shews the beginning of the bottom row of hitching:
Note how the free line (the eighth line that wasn't used) comes
around to be the core of the bottom row? You can use several
toothpicks to maintain the spacing shown, but with a little care
you should be able to put your half-hitch set precisely as shewn
to "cap" the upper row perfectly. Continue half-hitching along
the bottom of the diamond until you've used SEVEN leads
again. (Pic. #29) shews the bottom row completed to that point.

| 28 |
| 29 |

Then on the other side use the TAILING of the last set
as the core as shewn in (Pic. #30), and run another SIX
sets toward the bottom point.
as the core as shewn in (Pic. #30), and run another SIX
sets toward the bottom point.
| 30 |

(Pic. #31) shews the diamond completed. The JPEG
picture will shew more clearly the capping of all four
rows as described in the sketches on the previous page.
picture will shew more clearly the capping of all four
rows as described in the sketches on the previous page.
| 31 |

(Pic. #32) Only one last thing to do.... put some rows
of squareknots in and then do an "X" or "Cross"
shape. This is MUCH easier to do than the diamond!
of squareknots in and then do an "X" or "Cross"
shape. This is MUCH easier to do than the diamond!
| 32 |

(Pic. #33) Fill in to a point with squareknots, then
use a single toothpick to hold the orientation on
BOTH sides when starting your rows of half-hitching.
Leave the toothpick in until you've done at least four
sets to prevent overtightening.
use a single toothpick to hold the orientation on
BOTH sides when starting your rows of half-hitching.
Leave the toothpick in until you've done at least four
sets to prevent overtightening.
| 33 |

Bring the rows to a point as shewn in (Pic. #31).
| 34 |

(Pic. #35) Once you've completed the chevron, continue
knotting as shown, being careful to maintain the
straightness of the line all the way across the belt. The
openwork will form itself with no effort on your part as
long as the straight-line orientation is maintained. (It
appears crooked because there is no tension on any of
the lines)
knotting as shown, being careful to maintain the
straightness of the line all the way across the belt. The
openwork will form itself with no effort on your part as
long as the straight-line orientation is maintained. (It
appears crooked because there is no tension on any of
the lines)
(Pic. #36) The "X" completed. Now you can fill in with
squareknots and repeat the pattern, do another "X",
another diamond or put a long field of plain
squareknotting in, whatever thrills your tiller.
TIP: When making your belt in a pattern, decide on the
pattern first ( six rows squares, diamond, six rows square,
filled cross, etc. ) or whatever and make a test section to
check for length... This way you can "center" the patterns
on the belt, or lengthen the "fields" of squareknotting
between specials so that you come out with a symmetrical
belt from buckle (or belt-loop) to the start of the tongue.
TIP: Allow at least six inches of plain squareknotting as a
belt tongue so you have something to buckle into other
than the pattern. An Open Diamond is a lousy place for
the buckle to hit as you don't have anything to run the
buckle's tang through! Adding eight inches of plain
knotting at the end will give you ample room for expansion
in the future ( as we all do with time!) and preserve the
pretty pattern you've created. Remember also that your
pattern should stop about one inch from the lip of the
buckle.
TIP: I say "plain knotting" above", but you need
somewhere for the damn tongue to go into, so (for a 16 line
belt) knot four across for a base row, then knot three across,
knot four across, then the next row, knot the first and third,
then knot four and then knot three. This gives you a 'gap'
in each set for the buckle tongue... in #18 this gives you
appx. 3/4" of belt; in #21, about 7/8" and in #24 appx.
1-1/16". Make up eight inches for the buckling end and
you should be golden.
| 35 |

| 36 |
| NOTE! I have been contacted by several "Old Salts" who also make belts with corrections or emendations to this tutorial, and thanks to all who have done so! One VERY important item that was brought to my attention concerned finishing off the belt: Contrary to any other instructions in the tutorial, DO NOT trim off any splices, additions or drops until the belt is essentially done. Take the finished belt, dip in boiling water (98% water and 2% white vinegar) for a few minutes to "set" the knots, then hang in a not-too-sunny place and allow to air-dry completely before trimming off the ends and the "loosers" from the additions/ drops/ etc. This will give you a tighter-looking belt and will also (should the end-user throw it in a washing machine) give the knotting a much better chance of not pulling out. NEVER use fabric softener treatments when washing the belts! |

The object of all this pain and anguish is, of
course, to produce a thing of beauty which
hopefully will be enjoyed for a long time.
To the left (Pic. #38) is a performance belt
for a lady musician which, when finished,
will have taken over 130 hours to do. It is
of #18 cotton seine, 28 strand and is a
pattern of a small "five-diamond (one large
diamond containing four smaller diamonds),
one large "five-diamond", another small,
then a "ten-diamond" which is a large
exterior diamond containing nine interior
diamonds, and so forth.
I do not think I have ever seen a
"ten-diamond" previously and I have
certainly never seen a "capped"
"five-diamond" design. Note that the
"ten-diamond" square is ALSO capped in all
respects... maybe THAT ain't a bugger to keep
straight in your head!
At any rate, I'm damn proud of this work.
| 38 |
| ..... ..... ..... ..... ..... ..... ..... ..... ..... ..... ..... ..... ..... ..... ..... ..... ..... ..... ..... ..... ..... ..... ..... ..... ..... ..... ..... ..... ..... ..... ..... |
Of course, you may read through this
and say to hell with it. You will cut up
your hands a bit unless you're used to
handling a lot of line and you'll
definitely develop some interesting
calluses if you do this for a good
length of time.
Should you want a belt but be
unwilling to invest the time required
in doing one, that IS, after all, what I
do for a living. Here's my card.
(Pic. #39)
NOTE: The correct URL is
http://www.frayedknotarts.com
| 39 |
ROCKS AND SHOALS:
You CANNOT find Belfast Cord any longer. Don't try, I already have.
A good, hard-laid mason twine or seine twine is your best bet but when spooling off the line into the
working lengths, examine the line as you spool: at some point you will run across a line splice where
the material ran out and they tied in a new reel on the machine. When you do encounter one of
these, discard that working line... if you ignore the splice you will get an extremely ugly spot in the
belt when you try to knot over it. (Marty Combs sells a fine #15b cord which works quite well!)
Also be aware of "pulls", where the tensioner on the spinning machine was out-of-kilter and one of
the three strands was pulled much tighter than the others. Again, this will produce a non-uniform
appearance in the belt and this sort of material should be reserved for tying up newspapers.
Mason cord and seine twine are cheap... if there's summat wrong with the spool, buy another. Trying
to "make do" will just produce an inferior product and will make you and the end user unhappy.
Breaking a line in mid belt: (picture tutorial)
If you're doing a belt which is only squareknots, the solution is to back up two rows (just pull 'em
out!) and then take the new line ( I like to put a figure-eight knot in the end to prevent this line
being pulled through the square-knot as I proceed) and lay it alongside the line that broke where that
line is a filler (one of the centre pair) of a knot. Make your squareknot using the good line, the
broken line and the replacement line as filler, then, in the next row, drop out the line that broke
and, using the new line, proceed as though nothing had happened. A little extra tensioning will allow
you to carry on as though there was no break at all... After a few rows, turn the work over and trim
off the stub of the new line and the broken line and proceed from there. One break is acceptable, but
two repaired breaks close together start to compromise the strength of the belt and three means you
have defective line and should buy anew and start again. (picture tutorial)
If you have questions or comments, please feel free to email me and let me know.
Hope this was of some help to you! I welcome suggestions to make this tutorial easier to use.
Vince Brennan of "Frayed-Knot"
Philadelphia 2005
BACK TO PAGE ONE OF TUTORIAL
BACK TO KHWW MAIN PAGE VISIT FRAYED KNOTS WEBSITE
Hope this was of some help to you! I welcome suggestions to make this tutorial easier to use.
Vince Brennan of "Frayed-Knot"
Philadelphia 2005
BACK TO PAGE ONE OF TUTORIAL
BACK TO KHWW MAIN PAGE VISIT FRAYED KNOTS WEBSITE

| ..... ..... ..... ..... ..... ..... ..... ..... ..... ..... ..... ..... ..... ..... ..... ..... ..... ..... ..... ..... ..... ..... ..... ..... ..... ..... ..... ..... ..... ..... ..... |

| All content these pages © 2004-2010 Frayed Knot Arts. All rights reserved. Reproduction or use prohibited without prior written permission |