Now. let us explore the wild and wonderful method of making a footrope knot finial for
the bracelet instead of the star knot. You may want to do this for some reason, or
perhaps someone will have requested it, but for whatever reason, here it is.
The bracelet we did on the previous pages was of red, white and blue... for obvious
reasons, that color scheme and a footfope finial don't really go together too well, so
reserve this for when you're making the bracelet out of white line or a solid colour.
Assumption is that you're making this onto a six-strand half round braclet as shown
on PAGE ONE of this section.
Again, you've got a "slippery clove hitch" strop on the body where you wanted to
start the finial knot... don't take it off until we're almost finished.
STARTING THE KNOT
Separate the six strands as shown, but pick the strand CLOSEST to the centre and
hold that out. We won't be using it for the knot proper...it's just a filler.
Pass your first crown of five parts as shown to right... DON'T get it too tight as you'll
be tripling this knot and it nees some "breathing room".
Now pass the wall knot under it and even things up.
Pass your second, or doubling, crown and be sure the lines are all inboard the first
pass.... (neatness counts, here!)
Now pass your second wall knot... again, neatly and inboard everything.
Starting the second Wall......
Now pass the third (tripling) crown... same as before: neatly and inboard.
Now for some trickiness: for the third Wall, you want to take your spike and open the
passage into the knot as shown, being sure you go up and thru the middle (just like
the star knot..... sorta... only, different, y'know?)
Here's the third Wall with the spike removed and the line replacing it. Snug this up
but don't get over-enthusiastic about it. It's very easy at this point to so deform the
knot that your only option is to pull it out and start again. Just get the lines neat for
the moment.
Do this for the other four lines as well.
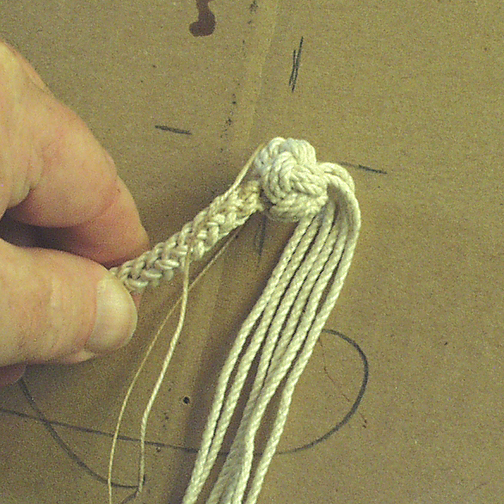
Footrope knot essentially finished up, but needing to be trimmed and tightened.
To tighten this knot, start back at the first pass and just pull a bit up with the tip of
your spike, and then follow this around and around until you've gotten all the slack
out without deforming the knot. You should see all three passes without any of the
lines being "buried" or "masked" by the others. I usually do all the crown tight, then
all the first wall tight, and so forth until I can take the little slack up thru the center and
trim all off.
After you have faired up the knot, you may remove the "slippery clove" from the braid
body. It will loosen up a wee bit but that's OK. If it looks sloppy, retighten the knot
OR just put a small simple whipping on it where it meets the footrope knot. Better to
have the knot tight enuf to hold the braid, but a whipping doesn't look too bad,
neither. Your choice.
All that's left is to CAREFULLY cut off all six lines a little ways into the interior of the
knot, but not too deep...the friction on the center is what's holding the lines from
pulling out. I like to trim everything out, then massage the knot a second with my
fingers, roling it around like a pea. This will close the top together and hide the
innards.
After massaging, I also stick the nozzle of my glue bottle into the center and put a
LITTLE glue in there to bind the ends together. After a while, you'll become
sufficiently proficient to be able to glue only the core lines, but not the footrope
exterior.
Bingo. Yer done.
This will quite adequately hold the loop on the lifesaver, but I still like the star-knot
better as it is wider and flatter on the back, thus providing a little more surface area
to hold the loop.
The finished footrope should be rather oblate in shape, rather than globular. The
oblate shape improves holding characteristics.
HAVE FUN MAKING THESE
I make them for sale and for give-aways. When I'm making more than a few, I'll do
thirty of each size like a production line:
Cut thirty sets of lines, glue and clip tips, hang,
Do thirty loops, strop and hang,
Do thirty small footropes (PAGE ONE), remove strops, hang,
Do thirty bodies to length, strop and hang
Do thirty starknots, trim and store in the appropriate size/colour box for future use.
Start over with a different bracelet length.
No rest for the wicked, eigh?
In a standard 8-hour day, with breaks for the bathroom and smokes, coffee and
lunch, I can do forty or so of these, but my eyes will cross. Remember this is
supposed to be an enjoyable hobby.... only fools like myself turn it into a business.
Have fun and if you have any questions, again, please feel free to EMAIL me.
Vince Brennan
the bracelet instead of the star knot. You may want to do this for some reason, or
perhaps someone will have requested it, but for whatever reason, here it is.
The bracelet we did on the previous pages was of red, white and blue... for obvious
reasons, that color scheme and a footfope finial don't really go together too well, so
reserve this for when you're making the bracelet out of white line or a solid colour.
Assumption is that you're making this onto a six-strand half round braclet as shown
on PAGE ONE of this section.
Again, you've got a "slippery clove hitch" strop on the body where you wanted to
start the finial knot... don't take it off until we're almost finished.
STARTING THE KNOT
Separate the six strands as shown, but pick the strand CLOSEST to the centre and
hold that out. We won't be using it for the knot proper...it's just a filler.
Pass your first crown of five parts as shown to right... DON'T get it too tight as you'll
be tripling this knot and it nees some "breathing room".
Now pass the wall knot under it and even things up.
Pass your second, or doubling, crown and be sure the lines are all inboard the first
pass.... (neatness counts, here!)
Now pass your second wall knot... again, neatly and inboard everything.
Starting the second Wall......
Now pass the third (tripling) crown... same as before: neatly and inboard.
Now for some trickiness: for the third Wall, you want to take your spike and open the
passage into the knot as shown, being sure you go up and thru the middle (just like
the star knot..... sorta... only, different, y'know?)
Here's the third Wall with the spike removed and the line replacing it. Snug this up
but don't get over-enthusiastic about it. It's very easy at this point to so deform the
knot that your only option is to pull it out and start again. Just get the lines neat for
the moment.
Do this for the other four lines as well.
Footrope knot essentially finished up, but needing to be trimmed and tightened.
To tighten this knot, start back at the first pass and just pull a bit up with the tip of
your spike, and then follow this around and around until you've gotten all the slack
out without deforming the knot. You should see all three passes without any of the
lines being "buried" or "masked" by the others. I usually do all the crown tight, then
all the first wall tight, and so forth until I can take the little slack up thru the center and
trim all off.
After you have faired up the knot, you may remove the "slippery clove" from the braid
body. It will loosen up a wee bit but that's OK. If it looks sloppy, retighten the knot
OR just put a small simple whipping on it where it meets the footrope knot. Better to
have the knot tight enuf to hold the braid, but a whipping doesn't look too bad,
neither. Your choice.
All that's left is to CAREFULLY cut off all six lines a little ways into the interior of the
knot, but not too deep...the friction on the center is what's holding the lines from
pulling out. I like to trim everything out, then massage the knot a second with my
fingers, roling it around like a pea. This will close the top together and hide the
innards.
After massaging, I also stick the nozzle of my glue bottle into the center and put a
LITTLE glue in there to bind the ends together. After a while, you'll become
sufficiently proficient to be able to glue only the core lines, but not the footrope
exterior.
Bingo. Yer done.
This will quite adequately hold the loop on the lifesaver, but I still like the star-knot
better as it is wider and flatter on the back, thus providing a little more surface area
to hold the loop.
The finished footrope should be rather oblate in shape, rather than globular. The
oblate shape improves holding characteristics.
HAVE FUN MAKING THESE
I make them for sale and for give-aways. When I'm making more than a few, I'll do
thirty of each size like a production line:
Cut thirty sets of lines, glue and clip tips, hang,
Do thirty loops, strop and hang,
Do thirty small footropes (PAGE ONE), remove strops, hang,
Do thirty bodies to length, strop and hang
Do thirty starknots, trim and store in the appropriate size/colour box for future use.
Start over with a different bracelet length.
No rest for the wicked, eigh?
In a standard 8-hour day, with breaks for the bathroom and smokes, coffee and
lunch, I can do forty or so of these, but my eyes will cross. Remember this is
supposed to be an enjoyable hobby.... only fools like myself turn it into a business.
Have fun and if you have any questions, again, please feel free to EMAIL me.
Vince Brennan
| FOOTROPE KNOT FINIAL |

| Last updated 2008-11-25 |
| Click on any picture to bring up a larger verzion! |