The Ringbolt Hitch, or "Spanish" Hitch
The Ringbolt hitch was originally used as a chafing guard and a "thump deadener" for deck rings on sailing ships. The rings
would be affixed to padeyes on the deck and to the rings were shackled or stropped the various snatch blocks and tail
blocks used to fairlead the sheets and other lines. To reduce wear, the ringbolt coxcomb served as a sacrifical surface as
well as somewhat deadening the impact of the rings on the deck's surface as the sails drew and spilled. Today it is used
mostly to cover things like rails or to add strength to a stropped eye around a thimble on, say, a bellrope. As such, it has
become a mostly decorative item, but it will provide an excellent grip on a tiller or a rail in a high sea or in a wet situation.
When used on companionway ladder rails, it also prevents some young seaman from doing the "submarine slide"; tucking
the rails into his armpits and sliding from level to level on a ship. This , in a high or rolling sea, can result in broken legs,
dislocated shoulders and sudden impacts with some poor buggar who wants to ascend said ladder at the same time.
(Young sailors all think they are either Erroll Flynn reincarnated or GI Joe action figures. A stay in the sick bay usually
dispells this idea, but it's far better to prevent their disillusionment!)
TIP: The amount of line needed to cover one foot of rail is totally dependant on (A) how large the line is, (B) how large
(diameter) the rail is and (C) how tight your work is. On a "standard" 1.75" diameter pipe rail, using #30 (3/32") cotton line,
each of three lines used will come out to appx. nine (09) yards per foot of rail covered. Thus, if you need to cover ten feet of
rail, you'd use three lines each 90 yards long. HOWEVER: This is only a "Rule of Thumb", so I URGE you to do a "dummy
run" first to determine the actual amount of line you'll need by coxcombing one foot of the rail, then removing the coxcomb
and measuring the actual length per line used.
Then add 5% to that length. It is far, FAR better to have extra line at the end of the run than it is to get to about six inches
away from where you WANTED to end off and find you've run out of line! (DAMHIKT*) Besides, you need some extra line at
the end to allow you to work the last few turns in tight and to end-off the run, and you can always use the extra line for
bellropes or other projects.
(*Don't Ask Me How I Know That: The picture shows a near disaster... if I'd needed five more passes I'd have been two passes short!)
TIP: You will find it convenient, if not essential, to "hank" up the line to be used with rubber bands at top and bottom of the
hanks.... pull out only as much line as is convenient to work with and just keep pulling more line as you go. Trying to do a
long rail without "hanking" or "balling" the line will result in the lay of the line loosening up as you progress, the line
becoming dirtied from being dragged over the deck or ladder, the line getting hopelessly snarled up and the entire job
taking far, far longer than is actually required, not to mention your getting royally pissed off at the whole thing. Take the
time to prepare properly... it will pay you in the end.
(Trust me on this!)
STARTING:
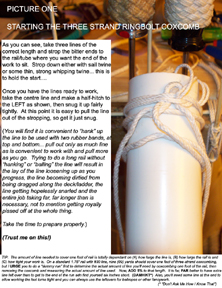
As you can see, I've stropped three lines of the correct length to the body
of the work at the point I wish the covering to begin. Use a good, thin
sailtwine or a whipping twine for this and strop it down tightly to secure
the lines.
Once you have the lines ready to work, take the CENTRE line and make a
half-hitch around the work with the line leading out to the LEFT. Snug this
up but don't over-tighten, as at this point it's quite easy to pull the line
out of the stropping... just snug it up.
SECOND HITCH:
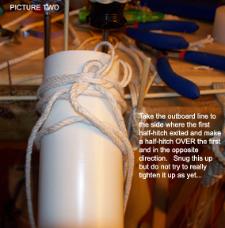
Take the outboard line from the left and lead it OVER the first half-hitch,
then make a half hitch with the line leading out to the RIGHT.
Again, just snug this up but don't really try to get it tight yet.
THIRD HITCH:
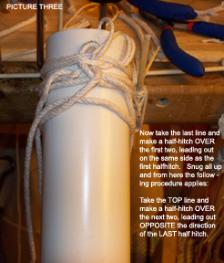
Take the outboard line from the right and lead it over BOTH previous
hitches, then make (what else?) a half hitch with the line leading out
to the left, same as the first hitch. Snug this up a bit more aggressively.
CONTINUING:
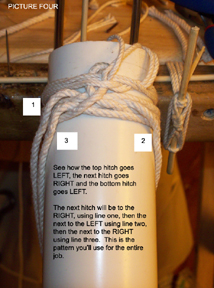
Now you'll follow a very simple pattern: Note how the TOP hitch and the
BOTTOM hitches always go in the SAME direction. From here, you ALWAYS
take the TOP line, lead it over the other hitches and make a half-hitch
going in the OPPOSITE direction. Once that's done, the top and bottom
hitches will again be going in the same direction... and that's the whole
secret to doing this.
Tighten each successive half-hitch up hard, but don't get stupid about it.
If you really tighten the devil out of these hitches, I guarantee you you'll get an
uneven job and it'll look like crap.
Use the "dummy" run to practice how much force to put into the tightening-
up aspect of things. Remember, consistancy is the real secret to
successful fancywork.
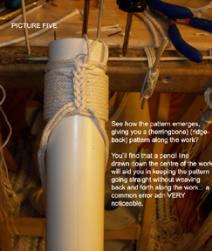
Here you can see the pattern emerging. This is what your work should look
like... a nice, regular herringbone pattern of interlocked chevrons. With
some patience, your herringbone will be even neater than this one, which
I had to hold in order to work it.m It's MUCH easier on a fixed object where
you can get some force into you tightening.
Although it's not apparent in the small picture, I've struck a pencil line down
the rail as a centre-line. You'll find that having this line to refer to will
produce a much straighter line of detail: wiggles in the line are VERY
noticeable and a common error.
Adjust your lines as necessary every four passes or so... after that,
if becomes very hard to move the wrap from side to side.
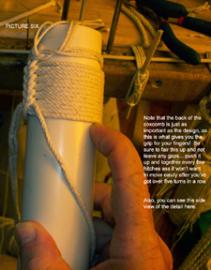
Don't forget the back of the design! It is just as important as the front, as
this is what gives you the grip for your fingers. Be sure you fair this up
(make sure there are no gaps) by pusing it up and into the rest of the work,
again, every four or five passes. After that, you'll find it doesn't want to
move easily, and after a few passes more it won't move at all.
You can see the side view of the herringbone and some gaps under each
pass... Let's talk about them....
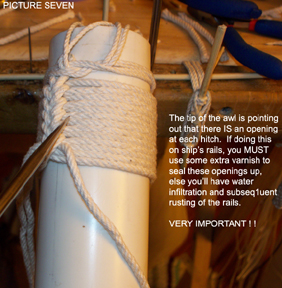
The tip of the awl is pointing at the openings in the wrap made by
the lines reversing direction to produce the herringbone. These are
unavoidable, although a good strong pull when tightening will reduce
them considerably. Even so, there will ALWAYS be an opening in the
wrap at this point and, if you're doing this on a ship's weather (exterior)
rail, you absolutely must use some extra finish (varnish, paint,
whatever) and close up these holes, or "holidays" in the wrap to
prevent seawater from entering under the wrap and causing rust
and eventual rail failure. Quite seriously, men have died from this
happening aboard ship. Coxcombed exterior rails are to be
inspected quarterly for signs of rust or weakness.
Finishing off can be accomplished by simply stropping all three lines tightly below the last turn necessary, sort of the way
you did the starting strop. Double up the strops at beginning and end, check your work for holidays and errors, then walk
away and have a cigarette or a cuppa coffee and then come back and check everything over one more time for errors or
flaws.
This is the LAST CHANCE you get to correct any screw-ups, 'cos the next step is to cut off the extra line at start and finish,
and then cover the ends with a turk's head. I like the 5x4 square turks, triple passes and in the next largest size line. (If
you're using a #30 [3/32"], then the covering Turk's head should be of #45 [5/16"] line or #60 [3/8"] line. This will look better
(IMHO, that is) as well as covering the "bump" of the herringbone a bit better.
If you're doing this on an exterior rail, trim the lines and the fill all the holidays and varnish/paint the job out for preservation
BEFORE applying the turk's heads... this way, you've waterproofed the job already and now you can put the turk's heads on
to finish things off without having to worry about water infiltration underneath the turk's.
On an interior rail, you can do the turk's covers and then paint or varnish the whole thing at once.
As always, your suggestions and critiques of the tutorials are encouraged!
BACK to the Coxcombing page.
| COXCOMBING Three Strand "Ringbolt Hitch" |
| Last updated 2009-09-04 |
| Click on any picture to bring up a larger verzion! |
