FINISHING THE END OF THE CHESAPEAKE BRACELET:
OK. I'm lazy. After doing four sets of photos and having none of them really suit my
purpose, you would be too. I'm doing the star knot with a whipped set of lines
instead of making up yet another bracelet body first. Shoot me. If you're doing this
as a continuation of the previous page, your braid will be stroped with a slippery
clove. DON'T undo that untill I tell ya!
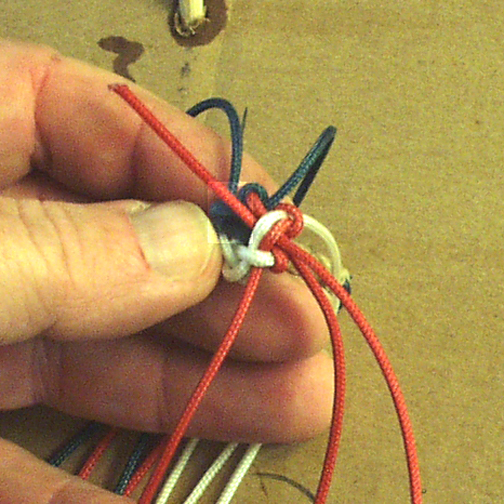
Here we have the standard "Patriotic" layout of six lines, two each of red, white and
blue, but just whipped together. Still works the same.
SEPARATE COLORS
First thing to do is to get the ducks in a row. Get your colors separated as neatly as
possible. You won't be able to get all three in perfect sets due to the way the braid
is constructed, but wiggle them about a bit until you approximate the mess at the
right. You'll thank me later. (Trust me.)
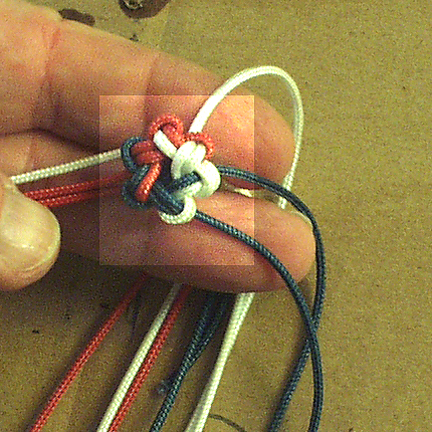
MAKING THE BACK LOOPS
Make an UNDER-LED loop in any of the lines (I chose blue). UNDER-LED means
that the free end of the line goes UNDER and out to the LEFT as shown. (You may
also, if left-handed, reverse ALL the directions on this page and have the line going
out to the RIGHT, but it MUST cross UNDER to form the loop. ) This is important as
otherwse the knot gonna fall apart. Not a good thing.
Now feed the next line to the RIGHT up and thru the loop you just made, then twist IT
to form a loop, and then...
Keep on tucking lines into the previous loop, forming another loop and so on until
you tuck the last line thru. Fair up (GENTLY tighten things) and you will have a
confection similar to the one at the right. Note that ALL the lines are coming UP and
thru the loop to their LEFT. This little construction will hold itself in shape once you
reach this point. (A good thing.)
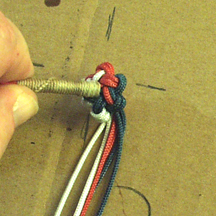
CROWNING AGAIN? Does it NEVER stop?
Yup. Make a crown to the RIGHT and continue doing this until all six lines have
been crowned. (Hey, don't blame me! YOU wanted to learn this!)
ALL CROWNED LOOSELY NICELY FAIRED UP
BACKTUCKING THE CROWNS
This take a bit of explanation: Take any line you care to (I used white for visibility)
and note that it comes out between the next crown... you want to take it and lead it
back UNDER ITSELF as shown to the right (click on it to get the big picture...it
helps!), put your thumb on top of all the crowns and tighten the line up gently.
DON'T "over-pull" on things at this point, all you'll do is upset the arrangement of
lines and make it nigh impossible to get a good looking knot out of your effort. Just
snug it lightly as shown in ...
This picture. Note how it parallels the red line ? You want the tucking line to the
inside of the knot and flat (or as flat as you can manage) with the loop you just made
about the same size as the one under it. A litle time and care here will save you
having to go back and "tease" the knot tight, something I dislike immensely. (Becos'
it's a pain in the...ahh... I don't like it.)
Now, the red line that you just paralleled is coming up thru a loop already, right?
The line you're tucking with will (still paralleling the red one) now get tucked DOWN
thru that loop so that there are now two lines in the loop. See the pic to the right
and expand it for clarity. (It's why I put 'em here, innit?) Once you've tucked this
down, again, gently tighten it so that it looks rather like the picture to our immediate
right.
See how there are two lines going thru
that side loop and the white and red lines
are lying side-by-side? The work of a
masterful knotter, if I ever saw.... oh.
(Ahem.)
Now, the trick is to do this with each line in turn. This is tougher than you might
think, as it's very easy to put the tucking end thru the wrong loop, or get the lines
crossed up, but a little patience, some attention and laying off the booze will help
your accuracy as well as your humour.
(Remember...the first time is just practise! That's what she told me, anyway...)
Continue doing each line in turh, take your time, use the spike to clearance when
you must, and eventually you'll have all six lines top-tucked and down the rabbit
holes, all lying flat and fair and you'll be ready for the next step in this insanity. The
pic to the right shows the assembly to this point.
This picture shows the back of the star with the lines coming OUT of the rabbit
holes... and it's here we'll be working for the next few minutes.
(That's not a loop of any sort at the top, by the way. The line just folded in that
way...pay no attention to it, a'tall, a'tall...)
DOING THE "UP-TUCKS"
This is the part where the starknot get's it's real form and strength. You WILL want
to look at the larger pic as I prattle on. The first line you choose to tuck up (again, I
used white for visibility) will cross OVER two lines before plunging into the center of
the knot. Here, your spike will be almost invaluable for clearancing the hole for the
tucking line. The object is to take the line, cross two lines to it's LEFT and then go
thru the space and up into the center of the knot's front.
In the WRONG example, the line is coming from the back, but it is SPLITTING the
lines on the face of the knot. This is NOT good. The RIGHT way shows the line
going right into the center of the face and that's what you want. Once you have the
line exiting in the right place, (again, gently) snug it down so that you get somehting
like the picture on the right.... note again that the line just tucked is laid alongside
the first line and lies toward the center of the work. Again, important for a really
neat-o, peachy-keen finished item.
And, finally, we have all six lines nicely tucked thru and led to the front thru the
knot's center. Here's a view of the finished back portion.
You may now remove that slippery clove hitch from the braid... the knot wil now hold
itself secure.
(We're almost done, believe it or knot!)
FINISHING THE FACE OF THE STAR
Some people just take and tuck each of the lines to it's immediate LEFT, lying
alongside the other two lines and down the rabbit hole again, but that leaves a void
area in the face of the knot. On a knot where you have six lines, however, you can
do something nicer... and it involves yet ANOTHER crown!
(But it's worth it.)
Here's a pic of the lines coming up thru the center... note that they're still in color
pairs?
Bundle three lines as shown above and then take the other lines and tuck them
down the rabbit holes as shown. Again, the line should lie nicely along the other
two. Snug up and repeat for the other two lines NOT in the bundle. In the third pic,
(1) has two blues and a white, (2) has two reds and a blue and (3) has two whites
and a red. (You gonna have to trust me on that one.)
OK. Now make that crown from the three lines you bundled up. THE CROWN MUST
ALWAYS GO THE SAME DIRECTION AS THE REST OF THE KNOT! Otherwise it
looks like...well, it don't look good.
Tighten up the crown and make it nice, tight and symmetrical.
Here's our finished crown knot in the center of the face. Study the picture and look
at the WHITE line. That one is now going to tuck down thru the rabbit hole where
the TWO BLUE lines are, directly to the LEFT of where it came out of the crown.
Here's a pic of the tuck in progress. Pull the line thru, do the other two tucks the
same way, then fair everything up. You may have to stick the point of your spike
under the two lines and lift them a bit, then tug on the tucked line to have them all
seat neatly, but for the purposes of this instruction, just getting (part A) into (tab b)
is gonna be a major triumph, especially reading THIS gibberish!
And so I present to you the finished face of the starknot with a simple crowned
center. Pretty, innit? Take a moment to enjoy your work.
OK. That's long enough. Back to "turnin' and burnin' ".
We need to secure the lines so they won't easily pull out and ruin the knot. Just
clipping them off IS an option, but in nothing flat they'll pull out of the loops and
unravelling is not long to follow that.
So, the secure them fairly well, we need to do one more series of tucks on the back.
By now you'll have noticed that each time we make a tuck, the knot is growing tighter
and tighter, more solid and more symmetrical. By now, the spike will be
indispensible for finishing the knot as we'll need to go under TWO lines this time.
You'll be working on the back of the knot as shown to right .
FINALIZING THE STARKNOT
Using your spike, clearance UNDER any pair of lines, then take the line
immediately to the RIGHT of that pair and tuck it UNDER and THROUGH so as to
"lock" it in place. Draw the line all the way through and try to get it to lie neatly, as
we have done previously, closest to the center of the knot.
Snug it good when set, but not REAL hard... that's coming up.
I find it helps me keep things straight if I "trap: the just-tucked line as shown when
clearancing and tucking the next line.
Continue tucking each line as described until all have been tucked thru. The last
"tuck" will be under three lines.
NOW: Take each line in turn and give it a nice firm pull to seat everyting. Go right
around the work a couple times as this will seat the lines and more-or-less make the
knot symmetrical.
(Knot shown): Now, get your cutters or nippers or (shudder) knife) and trim the
ends off flush with the side of the knot. (See the finished knots to right.)
Thank you for flying Confusing Airways! We hope you have enjoyed your flight.
Please be sure that all seat backs and tray tables are in their upright and closed
positions, or we'll throw you out of the plane before we land.
Now, How do I make a FOOTROPE KNOT FINIAL ???
OK. I'm lazy. After doing four sets of photos and having none of them really suit my
purpose, you would be too. I'm doing the star knot with a whipped set of lines
instead of making up yet another bracelet body first. Shoot me. If you're doing this
as a continuation of the previous page, your braid will be stroped with a slippery
clove. DON'T undo that untill I tell ya!
Here we have the standard "Patriotic" layout of six lines, two each of red, white and
blue, but just whipped together. Still works the same.
SEPARATE COLORS
First thing to do is to get the ducks in a row. Get your colors separated as neatly as
possible. You won't be able to get all three in perfect sets due to the way the braid
is constructed, but wiggle them about a bit until you approximate the mess at the
right. You'll thank me later. (Trust me.)
MAKING THE BACK LOOPS
Make an UNDER-LED loop in any of the lines (I chose blue). UNDER-LED means
that the free end of the line goes UNDER and out to the LEFT as shown. (You may
also, if left-handed, reverse ALL the directions on this page and have the line going
out to the RIGHT, but it MUST cross UNDER to form the loop. ) This is important as
otherwse the knot gonna fall apart. Not a good thing.
Now feed the next line to the RIGHT up and thru the loop you just made, then twist IT
to form a loop, and then...
Keep on tucking lines into the previous loop, forming another loop and so on until
you tuck the last line thru. Fair up (GENTLY tighten things) and you will have a
confection similar to the one at the right. Note that ALL the lines are coming UP and
thru the loop to their LEFT. This little construction will hold itself in shape once you
reach this point. (A good thing.)
CROWNING AGAIN? Does it NEVER stop?
Yup. Make a crown to the RIGHT and continue doing this until all six lines have
been crowned. (Hey, don't blame me! YOU wanted to learn this!)
ALL CROWNED LOOSELY NICELY FAIRED UP
BACKTUCKING THE CROWNS
This take a bit of explanation: Take any line you care to (I used white for visibility)
and note that it comes out between the next crown... you want to take it and lead it
back UNDER ITSELF as shown to the right (click on it to get the big picture...it
helps!), put your thumb on top of all the crowns and tighten the line up gently.
DON'T "over-pull" on things at this point, all you'll do is upset the arrangement of
lines and make it nigh impossible to get a good looking knot out of your effort. Just
snug it lightly as shown in ...
This picture. Note how it parallels the red line ? You want the tucking line to the
inside of the knot and flat (or as flat as you can manage) with the loop you just made
about the same size as the one under it. A litle time and care here will save you
having to go back and "tease" the knot tight, something I dislike immensely. (Becos'
it's a pain in the...ahh... I don't like it.)
Now, the red line that you just paralleled is coming up thru a loop already, right?
The line you're tucking with will (still paralleling the red one) now get tucked DOWN
thru that loop so that there are now two lines in the loop. See the pic to the right
and expand it for clarity. (It's why I put 'em here, innit?) Once you've tucked this
down, again, gently tighten it so that it looks rather like the picture to our immediate
right.
See how there are two lines going thru
that side loop and the white and red lines
are lying side-by-side? The work of a
masterful knotter, if I ever saw.... oh.
(Ahem.)
Now, the trick is to do this with each line in turn. This is tougher than you might
think, as it's very easy to put the tucking end thru the wrong loop, or get the lines
crossed up, but a little patience, some attention and laying off the booze will help
your accuracy as well as your humour.
(Remember...the first time is just practise! That's what she told me, anyway...)
Continue doing each line in turh, take your time, use the spike to clearance when
you must, and eventually you'll have all six lines top-tucked and down the rabbit
holes, all lying flat and fair and you'll be ready for the next step in this insanity. The
pic to the right shows the assembly to this point.
This picture shows the back of the star with the lines coming OUT of the rabbit
holes... and it's here we'll be working for the next few minutes.
(That's not a loop of any sort at the top, by the way. The line just folded in that
way...pay no attention to it, a'tall, a'tall...)
DOING THE "UP-TUCKS"
This is the part where the starknot get's it's real form and strength. You WILL want
to look at the larger pic as I prattle on. The first line you choose to tuck up (again, I
used white for visibility) will cross OVER two lines before plunging into the center of
the knot. Here, your spike will be almost invaluable for clearancing the hole for the
tucking line. The object is to take the line, cross two lines to it's LEFT and then go
thru the space and up into the center of the knot's front.
In the WRONG example, the line is coming from the back, but it is SPLITTING the
lines on the face of the knot. This is NOT good. The RIGHT way shows the line
going right into the center of the face and that's what you want. Once you have the
line exiting in the right place, (again, gently) snug it down so that you get somehting
like the picture on the right.... note again that the line just tucked is laid alongside
the first line and lies toward the center of the work. Again, important for a really
neat-o, peachy-keen finished item.
And, finally, we have all six lines nicely tucked thru and led to the front thru the
knot's center. Here's a view of the finished back portion.
You may now remove that slippery clove hitch from the braid... the knot wil now hold
itself secure.
(We're almost done, believe it or knot!)
FINISHING THE FACE OF THE STAR
Some people just take and tuck each of the lines to it's immediate LEFT, lying
alongside the other two lines and down the rabbit hole again, but that leaves a void
area in the face of the knot. On a knot where you have six lines, however, you can
do something nicer... and it involves yet ANOTHER crown!
(But it's worth it.)
Here's a pic of the lines coming up thru the center... note that they're still in color
pairs?
Bundle three lines as shown above and then take the other lines and tuck them
down the rabbit holes as shown. Again, the line should lie nicely along the other
two. Snug up and repeat for the other two lines NOT in the bundle. In the third pic,
(1) has two blues and a white, (2) has two reds and a blue and (3) has two whites
and a red. (You gonna have to trust me on that one.)
OK. Now make that crown from the three lines you bundled up. THE CROWN MUST
ALWAYS GO THE SAME DIRECTION AS THE REST OF THE KNOT! Otherwise it
looks like...well, it don't look good.
Tighten up the crown and make it nice, tight and symmetrical.
Here's our finished crown knot in the center of the face. Study the picture and look
at the WHITE line. That one is now going to tuck down thru the rabbit hole where
the TWO BLUE lines are, directly to the LEFT of where it came out of the crown.
Here's a pic of the tuck in progress. Pull the line thru, do the other two tucks the
same way, then fair everything up. You may have to stick the point of your spike
under the two lines and lift them a bit, then tug on the tucked line to have them all
seat neatly, but for the purposes of this instruction, just getting (part A) into (tab b)
is gonna be a major triumph, especially reading THIS gibberish!
And so I present to you the finished face of the starknot with a simple crowned
center. Pretty, innit? Take a moment to enjoy your work.
OK. That's long enough. Back to "turnin' and burnin' ".
We need to secure the lines so they won't easily pull out and ruin the knot. Just
clipping them off IS an option, but in nothing flat they'll pull out of the loops and
unravelling is not long to follow that.
So, the secure them fairly well, we need to do one more series of tucks on the back.
By now you'll have noticed that each time we make a tuck, the knot is growing tighter
and tighter, more solid and more symmetrical. By now, the spike will be
indispensible for finishing the knot as we'll need to go under TWO lines this time.
You'll be working on the back of the knot as shown to right .
FINALIZING THE STARKNOT
Using your spike, clearance UNDER any pair of lines, then take the line
immediately to the RIGHT of that pair and tuck it UNDER and THROUGH so as to
"lock" it in place. Draw the line all the way through and try to get it to lie neatly, as
we have done previously, closest to the center of the knot.
Snug it good when set, but not REAL hard... that's coming up.
I find it helps me keep things straight if I "trap: the just-tucked line as shown when
clearancing and tucking the next line.
Continue tucking each line as described until all have been tucked thru. The last
"tuck" will be under three lines.
NOW: Take each line in turn and give it a nice firm pull to seat everyting. Go right
around the work a couple times as this will seat the lines and more-or-less make the
knot symmetrical.
(Knot shown): Now, get your cutters or nippers or (shudder) knife) and trim the
ends off flush with the side of the knot. (See the finished knots to right.)
Thank you for flying Confusing Airways! We hope you have enjoyed your flight.
Please be sure that all seat backs and tray tables are in their upright and closed
positions, or we'll throw you out of the plane before we land.
Now, How do I make a FOOTROPE KNOT FINIAL ???
| The Chesapeake Bay Lifesaver Bracelet Part II STAR KNOT AND FOOTROPE KNOT ENDS (Continued from PAGE ONE) |
| Last updated 2008-11-23 |
| Click on any picture to bring up a larger verzion! |

While the instructions here will stand alone for making either a six-strand starknot or a five strand footrope knot as a finial end, they
are intended to complete the instructions on page one. If you have any questions or comments on these pages, please feel free to
EMAIL same to me.
are intended to complete the instructions on page one. If you have any questions or comments on these pages, please feel free to
EMAIL same to me.